Now Creating an e-invoice is just a touch away. GimBooks brings you a carefully designed easy invoice manager app for you to speed up your invoicing. It is the best Invoice App for your business.
Read below to check how GimBook’s easy invoice manager app can make make a difference
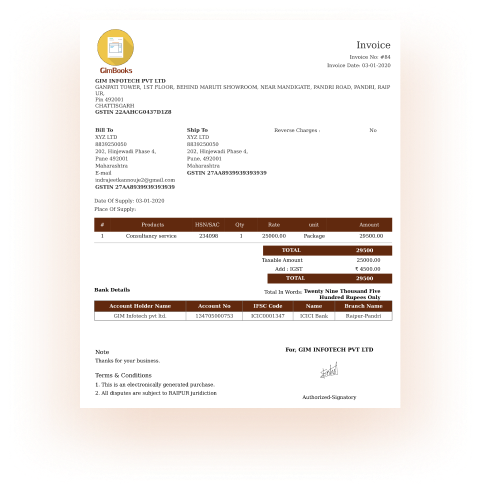
- It allows you to create your own professional and customized invoices specific for your industry with your company’s logo.
- It has all the functionality of the full invoice software suite.
- It has all the necessary elements for an invoice app
- You can generate single page format invoices to get all the information at one place.
- It allows you to store information of each client & simplify and expedite future invoices.
- GimBook’s easy invoice manager app is also very flexible enough to make changes to your e-invoice like adding additional items, combining multiple invoices into one, modifying the taxes and many more.
You can download the app on Google Play
So without any further ado, let's see how you can create your first E-invoice on mobile through GimBook’s easy invoice manager app
Check out the video instruction to create an invoice with GimBooks
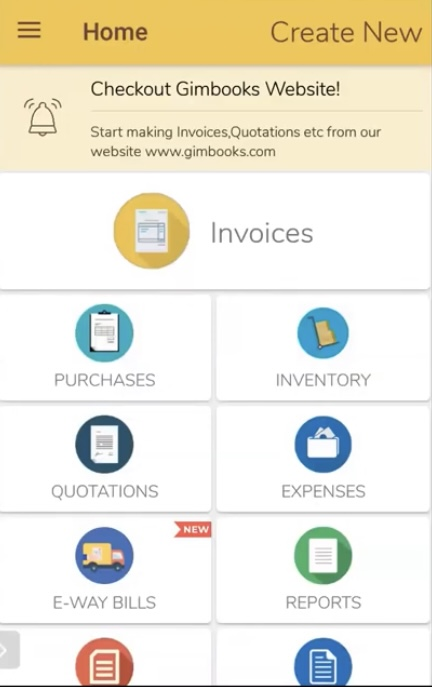
Home Screen
When you open your App, you will reach your Home Screen
In the Home Screen, you need to click on create New on the top right corner and you will reach a page where you can create an invoice.
You can create
- Tax Invoice
- Bill of Supply
Tax Invoice
If you have a registered GSTIN number, you can create a tax invoice.
On the top, you will be getting three options:
Invoice date - Invoice date will be automatically fetched when the invoice is being created.
Invoice Prefix - It will be blank by default. If you have any series that you are following for the invoices, you can add the series details here as a prefix or you can leave it as blank
Invoice Number - This is again automatically pulled up as per the number of invoices created under Easy Invoice Manager App - GimBooks. So again here, if you are following a specific series or number, you can change the invoice number.
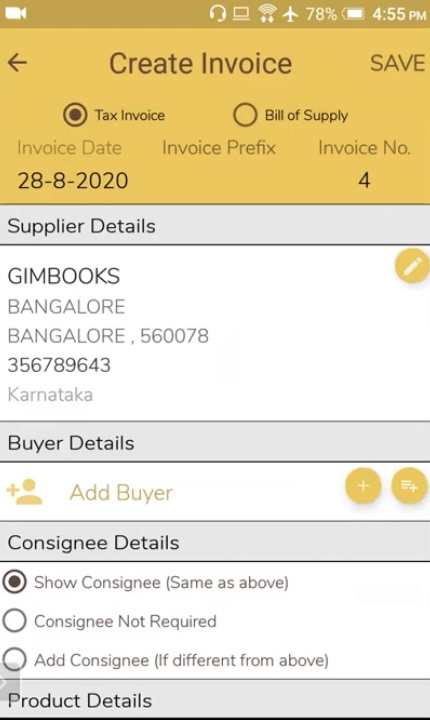
Supplier’s Details
Then comes the Supplier details which is your form details. Inorder to edit or view the details, you can click on the pen mark.
Once you click on it, you can enter following details:
- Form Name
- Registered GSTIN Number
- Pan Card
- Email Address
- Mobile Number
- Address
- City
- State
- Pincode
Optional Details
Then there comes optional details. If you want to add more details about your firm like ISO certificate number etc, you can add.
Company’s Logo
You can add your company’s logo here. When you click on the ‘image’ icon,
Two options will pop up
- Select Logo From Gallery 2. Delete it
After you are done adding it, you can save the details.
Buyer’s Details
Then comes the buyer’s details. Click on the Plus mark (+) to proceed with it.
Here you have to enter the GSTIN number,
Once you enter it, the following details is fetched automatically:
- Company Name
- Address
- City
- State
- Pincode
You have to manually input the email id & mobile number
Optional Details
There again comes optional details where you have any other information, you can fill it up.
We also have a check box which states that Do you also purchase items from this buyer?
If you check it, the details will be added to the seller details.
Save it by clicking on the check mark
Consignee Details
Then comes the consignee details.
You are provided with three options here:
- Show Consignee ( same as above)
- Consignee not required
- Add Consignee
You have to check on from the above options.
Product Details
Then you have to select the product. If you have already created invoices, the products will show up and if you have not created then you can manually add by clicking on the top right corner
You can add the details.
When you select the product, the HSN code will automatically get fetched and you just have to add the quantity. You can also add the discount that will automatically be taken to the value.
The taxable amount - CGST, UGST, IGST & cess will get fetched accordingly.
Click on Save
If you want you can add the multiple products as well.
Transportation Details
Then comes the transportation details
You can select the options from By Air/ By Road/ By Sea
Then add further details
- LR number, vehicle number,
- Date of supply,
- Transporter name,
- Place of Supply,
- Transporter ID
And if you want any optional details, you can also add it.
Save it.
Others details
If you want to link the invoice to some previous invoice then you can add the PO number and the date. Or else leave it blank
You can also add charges like :
- freight charges,
- Loading charges,
- Packing charges,
- Insurance charges,
If you want to add any more charges like booking charges etc, you can also add it with the cost
The due date will be your invoice due date. And if you have any e-way bill number, you can add that as well.
Save it
Bank Details
Then comes the bank details. If you want to add your bank details in an invoice, you can add or leave it as blank
- Bank Details
- Account Holder Name
- Account number
- Branch IFSC
- Branch
- Bank
- Optional Details - Original/Duplicate/Triplicate
Terms & conditions
By default, there will be two terms and conditions. You want to add you can add it or delete it
Signature
You can draw your signature if you want to. You also get the option to redo it.
Save all the details
The invoice is generated and you can preview it by clicking on the ‘Preview’ button on the bottom.
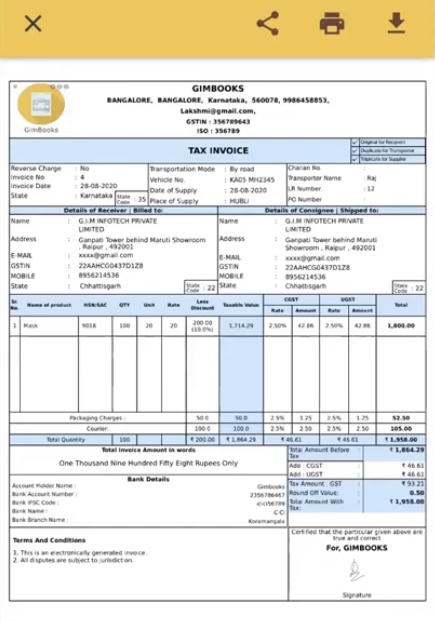
You have the option to save / share / download / print the invoice.
By now it must be clear how easy it is to generate your invoice on mobile through Easy invoice manager app. If you have any doubts, you can contact us.
Also Read,